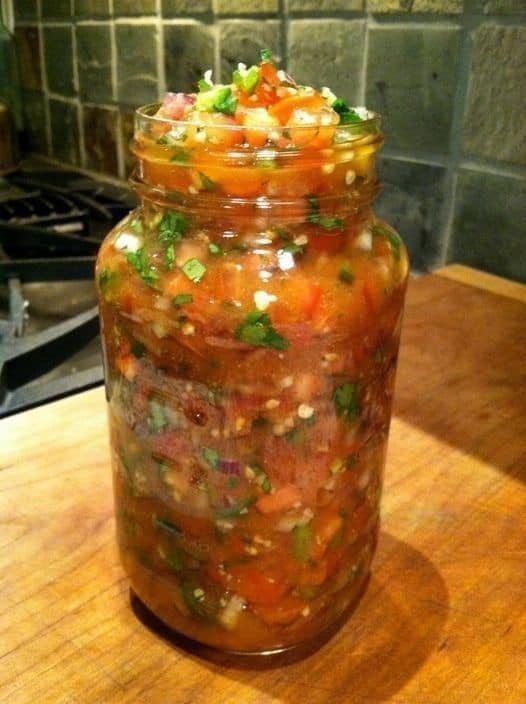
This fresh and easy-to-make Pico de Gallo will soon be your go-to appetizer for any gathering! Using all fresh ingredients, this Pico de Gallo is bursting with flavor and can easily be adjusted according to taste preferences.
Last week was spring break, and it was a balance of busy and relaxing. I spent a few days searching for a job and attending a job fair; I spent a few days shopping with my momma, spent some time catching up with friends, and spent some time watching Netflix. It was a perfect balance.
During spring break, my mom and I decided to take a cooking class at Sur la Table. It was something we had wanted to do forever, and since we had the same spring break, we decided this was the perfect opportunity to take a class. We decided on the Vegetarian 2.0 class, and I was super excited about it. I was excited to learn new cooking techniques from a chef and be able to take a class together with my mom.
The class was small, but it was personal and very awesome. I learned new techniques for using a knife, chopping onions, cutting herbs, and more. I was inspired by all the delicious recipes we made, and sitting down to eat everything after we cooked it all made me realize how amazing homemade food is and how it can bring so many people together. I immediately thought of when I was going to make the recipes next to share with family and friends and ended up making one of the recipes to bring as an appetizer to a game night later that week!
I left the cooking class inspired to get back in the kitchen, but I also reflected on the process of cooking itself. The class was two hours long, and we made four recipes. Some recipes took longer than others, but it did take a lot of time to bring the recipes together. Nothing was too challenging or anything, but some recipes called for a lot of chopping or assembling. We had three people in the class, so that divided up the workload for each recipe and brought us together as we worked through each recipe.
I reflected upon how my cooking has changed over the past year or so. I have adopted a more whole and real food approach to eating, which has resulted in more time spent in the kitchen. I spend more time cooking meals from scratch — everything from sauces to seasonings. I try to make everything homemade as much as possible, which of course, takes more time than buying it at the grocery store. But I can’t say that I ever complain about it. I love the time I spend in the kitchen preparing foods for myself, and others that I know are going to nourish our bodies with the good stuff.
Sure, I spend more time than the typical 22 years old does in the kitchen, but it is time well-spent, in my opinion. I am practicing different styles and methods of cooking and growing my knowledge of food in the process. It is something I love and something I am willing to spend the time and energy on.
A few days after the cooking class, I decided to create a fresh Pico de Gallo recipe for the blog. Pico de Gallo is a favorite topping of mine on tacos, burrito bowls, or whatever else I can think of adding it to. I wanted to create a Pico de Gallo recipe that would be a go-to for myself and for you all, my readers.
I wanted it to be a simple recipe that was not overly complicated. Because let’s be real, it’s Pico de Gallo, not a four-course meal! I bought all the ingredients I needed and got to work on them. When I first went to make it, I assumed it would be about 5 minutes of prep work to make. But when I actually started chopping and slicing and cutting everything, it took me longer. I will admit I am a very slow chopper, especially when it comes to onions! 🙈 And to be honest, I did not mind it. Sure it took me a while to get everything prepped, but as I put it together into the bowl and began mixing it all up, every minute, I spent on this Pico de Gallo became worth it.
The fresh flavors came out after I let it marinate in the fridge for an hour. And all the time I spent, even if it was longer than I had originally planned on, was worth it. Sure, I could have thrown everything in my food processor to chop up, but there was just something about taking that time to create this recipe from scratch. All my energy poured into this Pico de Gallo, and it became a labor of love.
So I certainly hope you love it as much as I did! Take the extra time today to create this Pico de Gallo that is made of all real and fresh ingredients.
And stay tuned here on the blog because later this
Crack cake, also known as cake mix cake or pudding cake, is an insanely easy cake recipe that produces the most moist, decadent, and addictive cake you’ll ever eat. This recipe combines a simple boxed cake mix with instant pudding and sour cream to create a sweet treat with an irresistibly tender crumb and rich flavor.
The name “crack cake” comes from two things. First, the combination of dry packaged ingredients keeps the prep easy and fast. Second, the cake is so mouthwateringly delicious that it’s nearly impossible to stop eating it once you have a bite – just like an addictive drug, hence “crack cake.”
While the full recipe has only a handful of ingredients that get stirred together in minutes, the results are absolutely over-the-top. Perfectly moist texture, dense cake crumbs, and deep flavor make this the ultimate cake for birthdays, celebrations and anytime you need an insanely easy crowd-pleasing dessert.
Read on to learn how simple mixing up a boxed cake recipe can produce professional-bakery-level perfection. The step-by-step method and tips will have you whipping up crack cake that looks impressive and tastes even better.
Ingredients Needed for Irresistible Crack Cake
The beauty of crack cake is that it comes together with common ingredients you likely have on hand:
Boxed cake mix – Any flavor works, like vanilla, chocolate, spice or funfetti. Look for high-quality brands.
Eggs, oil, water – As needed per the instructions on the cake mix box. This binds the batter.
Instant pudding mix – Vanilla or cheesecake flavors work best. Adds moisture.
Sour cream – Makes the cake extra dense and tender.
Chocolate chips, toffee, candy – Optional mix-ins to make it over-the-top.
Frosting – Any creamy frosting complements the cake. Cream cheese is perfect.
That’s truly all you need for easy crack cake bliss. The key is using ingredients that add moisture, like the pudding and sour cream. Now let’s get to the dead simple method.
Step-by-Step Instructions for Making Crack Cake
Preheat oven to temperature listed on cake mix box, usually 350°F. Grease a cake pan well.
Make cake batter as directed on box, using eggs, oil and water. Mix just until blended.
Add pudding mix and sour cream to batter. Beat again until fully combined.
Fold in any mix-ins like chocolate chips, toffee bits, crushed candy.
Pour batter into pan and evenly spread out. Bake for time listed on box.
Cool cake completely before frosting – at least 1 hour. Chilling speeds up frosting.
Generously frost top and sides with desired frosting. Refrigerate frosted cake.
That’s truly all there is to it! Now let’s go over some tips for perfect crack cake every time.
Tips and Tricks for Making Irresistible Crack Cake
Follow these tips when whipping up your cake mix cake:
Use high-quality cake mixes for the best texture like Betty Crocker or Duncan Hines.
Adjust baking time if using a different size pan than listed on the box.
Beat the batter well after adding the pudding and sour cream.
Grease the pan well for pretty, intact cake sides when serving.
Refrigerate the completely cooled cake 30 minutes before frosting.
Use any flavor frosting you like! Cream cheese, vanilla buttercream, chocolate are all amazing.
Store the finished cake refrigerated for up to 5 days.
Mix up a batch using these tips and get ready for the new favorite cake in your recipe collection. Now let’s go over serving ideas and adaptations.
Serving Suggestions for Crack Cake
This easy cake recipe is perfect for:
Birthdays, celebrations, anniversaries
Potlucks, parties, backyard BBQs
School or office parties, bake sales
Dessert buffets or chic cake stands
Party favors or gifts for friends and teachers
Fun weekend project with kids
Plated restaurant-style dessert
Any day you need an impressive cake, fast!
Crack cake impresses guests but takes just minutes to prepare and pleases all ages. Adapt it to your needs:
Use gluten-free or dairy-free cake mix
Swap in allergy-friendly frosting
Decorate simply with sprinkles or elaborately with flowers
Nutrition Information for Crack Cake
Like any rich cake recipe, crack cake is high in fat, carbs and calories, so moderation is key. The nutrition will vary based on ingredients:
Cake mix – Look for options with less fat and sugar.
Eggs and oil – Provide protein and mostly unsaturated fats.
Pudding – Uses nonfat milk and contains some protein.
Frosting – Adds carbs, fat, and calories from sugar.
Mix-ins – Candy, chips, and toffee add even more sugar.
Crack cake is definitely a special treat best enjoyed occasionally and in small portions as part of an overall healthy diet. The recipe is easy to modify by swapping the ingredients.
Crack cake truly lives up to its name as being irresistibly easy, moist and addictive. With just a cake mix, pudding, and sour cream it bakes up incredibly delicious and tender. Top with frosting for picture-perfect results.
Whip up this crowd-pleasing recipe for your next celebration, party or potluck. Store and serve it like a bakery-quality creation. Just beware – it might disappear quickly!
With easy prep, simple ingredients, and insane moistness, crack cake delivers impressive results with little effort required. Indulge in a slice of chocolate, vanilla, spice or any flavor you crave.
Ingredients
For the Cake:
1 box of yellow cake mix
1 packet 3.4 oz instant vanilla pudding mix
4 large eggs
2 teaspoons ground cinnamon
1/4 cup white sugar
1/4 cup brown sugar
3/4 cup water
3/4 cup vegetable oil
1/2 cup white wine
For the Butter Glaze:
1/2 cup unsalted butter
1 cup white sugar
1/4 cup white wine
Instructions
Preheat and Prep: Start by preheating your oven to 350°F (175°C). Generously grease a 10-inch bundt pan; set aside.
Mix the Batter: In a spacious mixing bowl, combine the yellow cake mix, instant vanilla pudding mix, eggs, cinnamon, white and brown sugars, water, vegetable oil, and white wine. Stir until just blended—no need to overmix!
Bake the Cake: Carefully pour the batter into your prepped bundt pan. Slide it into the oven and let it bake for about 45 minutes. To check for doneness, insert a butter knife into the cake; it should come out clean.
Glaze Time: The moment your cake is out of the oven, it’s time to make the glaze. In a saucepan, melt the unsalted butter, add the sugar and white wine. Cook this mixture over medium-high heat for around 4-5 minutes, or until the sugar fully dissolves.
Infuse the Cake: Use a fork to poke holes all over the cake’s surface. Drizzle the freshly made butter glaze all over, letting it seep into those holes.
Unmold and Serve: Gently loosen the cake’s edges and center using a knife. Invert the cake onto a large serving plate. Best enjoyed warm!
Notes
For maximum flavor, pour the butter glaze over the cake while it’s still piping hot.
Avoid overbaking; it could make your cake dry.
Elevate your dessert by serving it with fresh fruits and a dollop of whipped cream.
Store any remaining slices in an airtight container at room temperature.
